3D printer review: Afinia H-Series makes great parts, despite software
This file type includes high resolution graphics and schematics when applicable.
Currently the third most-popular 3D printer in the U.S., the $1,599 H-Series printer from Afinia, a division of Microboards Technology LLC, Chanhassen, Minn., is lauded for its ease of use and overall quality. It prints with fused-deposition modeling (FDM), a technique that generates strong and watertight parts. We recently got an Afinia machine to test and found its software and instruction manual hard to use. Once we discovered a few workarounds, though, the 3D printer performed quite well.
Related Articles
• Beware 3D printing?
• MarkForged: $5,000 3D printer prints carbon-fiber parts
• Gallery: Weird 3D printing machines of the week
First some background. The H-Series is a rebranded version of the Up Plus 2 3D printer manufactured by 3D Printing Systems Ltd., Sunnyhills, New Zealand, in China. The Afinia and Up Plus 2 are nearly identical but the Afinia is sold in the Americas with slightly modified electronics and dedicated technical support. In addition, Stratasys Ltd., Edina, Minn., is currently suing Afinia for patent infringement. By most accounts, Afinia’s success in the 3D-printing market has made it a conspicuous target, as sales of the Afinia printer trail only those of printers from Stratasys and 3D Systems Ltd., Rock Hill, S.C.
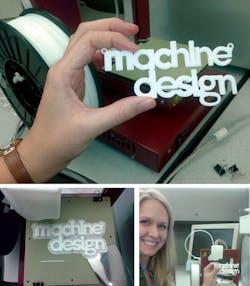
For our tests, we made a MACHINE DESIGN hangtag and a hollow toy-sized replica of a RoboCop Droid. First, we loaded the Afinia 3D Print software onto a Dell laptop, and connected the Afinia printer to the laptop via a USB cord. Then within the 3D-print software, we honed the hangtag and Droid models, scaled them to suitable trinket sizes, and commanded the Afinia to print them. The quality of parts produced by the Afinia H-Series is excellent. In fact, the machine we tested held tolerances to within 0.005 in. Here’s what else we discovered about the Afinia H-Series.
Part tolerance: Within 0.15 mm (0.006 in.) with a layer thickness from 0.15 to 0.4 mm.
Print Dimensions: 5 in.3
Speed: Linear print speed is 30 mm/sec. Like most desktop 3D printers, the printing platform also has a heating element to get finished parts to lift off with less prying.
Footprint: The 9.64 x 10.23 x 13.78-in. machine weighs less than 11 lb.
Print material: ABS plastic filament is $31.99 per kg ($0.02 to $0.05/cm3). Filament size is 1.75 mm. The Afinia ships with a starter-spool of white ABS plastic. One caveat: Even though the Australian version of the Afinia (the UP Plus 2) can use ABS and PLA plastics, the literature that comes with the Afinia discourages using anything other than ABS. Afinia doesn’t recommend buying the ABS from other suppliers, either. Afinia sells ABS in natural (an ivory color), black, red, blue, yellow, and green.
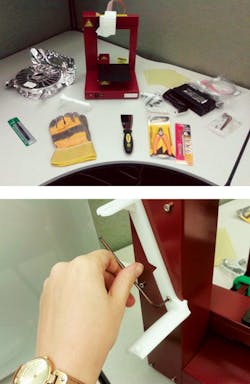
The Afinia prints parts on a base of support material printed with ABS, so the only way to remove the support material from printed parts is to break it off. Luckily, the software does create "smart" support structures that are easy to snap or cut off.
Computer compatibility: The printer works with PCs and Macs. We tested the machine with a Windows 7 PC. However, check with the manufacturer for the graphics card required. One of our computer’s graphics card had too little power to properly display and allow manipulation of the RoboCop Droid model.
Assembly: Comes fully assembled, sans the spool holder. But the spool holder attaches quickly with an Allen wrench (included).
Tools needed: The Afinia ships with everything a designer needs to print and remove support material. We suggest having super glue handy for reattaching any pieces that break off printed parts. Also, as a safety precaution, we wore safety goggles to protect our eyes from bits of plastic that fly off when removing more stubbornly affixed support material with an X-Acto knife (also included).
Multicolor printing: To print multiple colors, figure out where on the model the machine should stop printing. Then, before hitting print, enter that position’s X, Y, and Z coordinates into the software. The machine will stop at these positions to let the user replace a spool of one color with a spool of a new color.
Software and preparing the CAD model: The software and instructions manual covered the most important considerations for a designer. However, we found a number of quirky obstacles.
• Undo/reverse: There’s no Undo button, so when using the Scale tool, be aware that any rescale is based on all previous rescales.
This file type includes high resolution graphics and schematics when applicable.
Measurement, troubleshooting, and more
This file type includes high resolution graphics and schematics when applicable.
• Measure tool: To see the overall dimensions and volume of a model , we clicked on it within the software. However, there’s no tool to measure sections of the model. So, when we wanted to rescale the model in the software, we had to take the model back to our stand-alone CAD software and use its measure tool to find the new dimensions of a section.
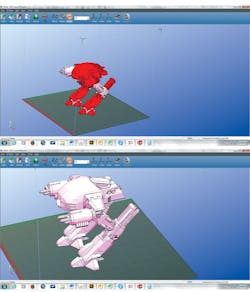
• Unclean-file warning: Pay attention to the color of the model in the software. It’s the only indication that a model will or won’t print correctly. Red-colored sections have holes or other inconsistencies; light pink sections are okay. Otherwise, there are no other warnings or messages. In contrast, most professional CAD software gives messages on the bottom toolbar that declares a model Fully Defined or Undefined.
By clicking Edit > Fix, your model should turn light pink. If there are still red sections at this step, clean the CAD file in another program such as Netfabb or, better yet, in professional CAD software. The Affinia’s Fix tool is one-click, so there are no options to see or adjust what the software is doing to fix the model.
• Units: The program is in millimeters and there is no way to change the units.
• Instructions manual: The printed manual that comes with the Afinia is helpful but poorly worded. Our least favorite is the manual’s instructions on how to navigate the software. First it directs the user to submenu items, and then to where they’re found — so instead of saying “Go to Edit > Fix” the manual says, “Click the Fix option from the Edit menu.” In fact, we recommend following the online instruction manual (at afinia.com/support/manuals-guides) instead of the printed manual. The online manual is more comprehensive and includes more photos.
• Setting up and calibrating the printer: The instructions to set up the printer were straightforward, but there was confusion or lack of appropriate interface messages on the following steps.
4. We used a smartphone app to get the printer platform level. A level platform prevents the nozzle from scraping and lets the printer make even parts.
• Confirmation of connection: The Afinia H-Series connects to a computer via a USB cord. However, it’s not always obvious when the printer connects successfully. One way to check is to go to 3D Print on the Afinia software’s toolbar and make sure all options are available for use — especially the Maintenance option.
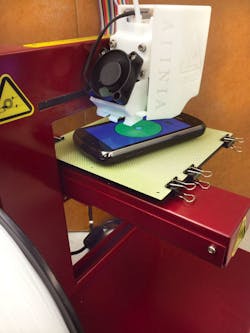
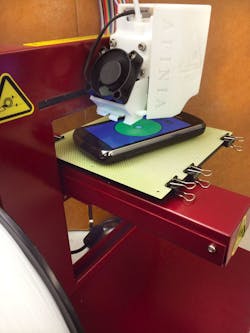
• Leveling the platform: If the platform is not level, the print won’t be even. What’s worse, the nozzle can scratch against an unleveled platform, which puts it at risk for damage. To level the platform, don’t eyeball it. Get a level and use the manual screws at each corner to adjust. We used a smartphone with an app called Bubble Level. Placed it on the platform, it told us when we were on target.
• Setting nozzle height: The nozzle height is the distance between the platform and the nozzle. The desired nozzle height for printing is when the platform sits as close to the nozzle as possible without touching it — about 0.001 in. To move the platform to the fixed nozzle, the user must enter into the Afinia software the desired nozzle height in millimeters. Note that the platform height cannot be manually adjusted.
This step is hard because the software reads the platform at 0.00 mm when the platform is furthest from the nozzle (and not when it’s touching the platform, as one might expect). It’s also hard to physically measure the distance between the nozzle and platform. That forces the user to guestimate the distance and then input small increments until the platform reaches desired height. We used an online reference at machinedesign.com.technologies/3Dprinting to hone in on a nozzle height of 134.4 mm. Tip: Place a sheet of paper between the nozzle and the platform. When it’s hard to move the paper, the nozzle is at an ideal height.
Printing: After cleaning the 3D model and setting up the machine, we were ready to print. However, we ran into a few additional hiccups.
Related Articles
• Beware 3D printing?
• MarkForged: $5,000 3D printer prints carbon-fiber parts
• Gallery: Weird 3D printing machines of the week
• Estimating print time and amount of material: There is no way to check how much time it will take or how much material is required to print a project while scaling, multiplying, or fixing a model in the software. The only time the user is given this data is after pushing the Print button. If the user wants to change the model to reduce the time or use less material, the print job has to be canceled. Then the designer has to manipulate the model in the software, or separate CAD software, and reload into the printer.
• Warning after hitting print: When printing our RoboCop Droid, we hit print and got this message: “Error: Part material not enough, Add material? Yes or No?” We had enough material on the spool, and the file within the software was completely light pink (so had no errors). When we clicked on "Yes" nothing happened. When we hit "No" the machine started printing the Droid.
Resources
This file type includes high resolution graphics and schematics when applicable.
About the Author
Lindsey Frick
Associate Editor
Lindsey has been an Associate Editor for Machine Design since 2012. She holds a Bachelor of Science in mechanical engineering from Cleveland State University. Prior to joining Penton, she worked in product design, packaging, development and strategy, and manufacturing. She covers the materials market and other areas of interest for design engineers such as 3D printing and methods to operate efficiently.
