What’s the Difference Between Bearing, Shear and Tear-Out Stress?
Jointing is a basic function of engineering. For example, bolting two parts together can involve material properties and loading forces. Here, we will focus on preloading, shear and tear-out in a bolted assembly. However, designers must consider multiple engineering principles including the internal and external loads discussed in a number of articles on Machine Design’s website.
Engineers may have learned about these stresses in school, but one of the factors that complicate what might seem like a simple bolted joint is the clamping force, or preload. Calculating non-preloaded connections can use typical shear and bearing formulas explained later in this article. However, preload is often a factor in a joint’s fatigue life; it introduces tensile forces, and can promote creep.
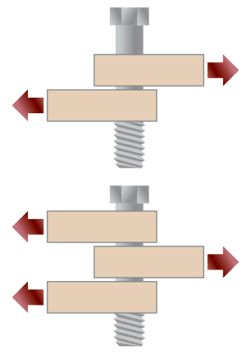
It is important to calculate the proper area. Depending on the design, a pin or bolted joint might share a load over multiple surfaces In the second of the two images above, the load will be distributed over double the area.
In a rigid assembly, the preload is higher than that of the service load—thus the service load will, or should, have little effect on the fastener tension forces. This reduces fatigue failure even when a dynamic of fluctuating load is applied. This only applies if the designer considered the difference of the tensile strength and endurance limit of the fastener.
A cyclic stress on a joint will be designed to the endurance limit, not the tensile strength of the fastener. For example, if a fastener has a minimum tensile strength of about 150 Kips, but the endurance limit is 15 Kips, a joint under a cyclic load will not be able to exceed 15 Kips or it can fail prematurely due to fatigue.
According to a technical memorandum for determining bolt load published by NASA, bolts should typically generate a clamping force that, if designed properly, will carry less than 20% of the external loads on the bolts. The majority of the work is performed by the compressive energy induced on flanges while the bolts are tightened.
Many variables affect preload, including tensile strength, finish, head style and lubrication. Lubricants will reduce the torque required to produce a clamping force. Coatings may reduce or increase required torque. Multiplying the standard dry torque by as much as 0.45 to 1.70 can compensate for lubrications and coatings.
For example, Molybdenum grease, film and paste can reduce the torque needed to produce a proper clamping force by 30%, 40% or 45%, respectively. Unfortunately, there is no simple, totally reliable way to compute the precise preload needed for every application. Factors such as the bolt head, thread type, washer and fastener plates also help increase surface area to prevent creep that will cause the preload to be reduced and potentially cause slippage or introduce another mode of failure.
There are standards that can also help guide you in preloading your fasteners. However, this is not a quick fix, as each standard focuses on a different application or technology. ASTM, ANIS, ASME, IOS and others may overlap while others might have gaps between them.
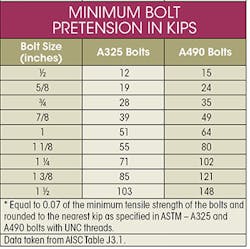
ASTM specifications for A325 and A490 high-strength bolts are to be tensioned to 70% of the minimum tensile strength. The table above shows this minimum bolt pretension for empirical bolt sizes. The percentage can vary, but this is an adjustment depending on the materials offset yield point.
For rigid steel parts, the basic guideline given by the Machinist’s Handbook is to tighten the fasteners to 75% of off-set yield point or proof strength. Lower torques should be considered for flexible joints, joints with gaskets or assemblies subject to high temperatures.
The Federal Aviation Administration offers this example: “The amount of clamping force exerted by a properly tensioned fastener is normally stated to be about 75% of the proof load. The proof load of an SAE J429 Grade 2 bolt is 4,250 lb. The resulting clamp force is:
4,250 * 0.75 = 3,187.5 lb
The amount of torque required to achieve this load is approximated by:
T = K*D*Fp
where:
T = bolt torque in inch pounds
K = friction coefficient (dimensionless)
D = nominal bolt diameter (inches)
Fp = Axial clamp force (pounds)
Substituting the numbers into the equation:
T = 0.2 * 0.375 * 3,188 = 239.1 inch pounds or approximately 20 ft-lb
So a dry SAE Grade 2 bolt should be torqued to approximately 20 ft-lb to achieve a clamping force of 3,188 lb. However, NASA’s Technical Memorandum mentions that bolts can be 65% to 90% of a material’s yield strength. Again, this shows the range of a bolted joint can vary depending on application, safety factor, standards, and how conservative you are with calculations.
According to NASA, it also is generally safe to assume the uncertainty for hand-operated torque wrenches on lubricated fasteners to be ±25%. When using a load-sensing instrument, though, the preload uncertainty factor may be reduced to ±5% uncertainty.
Bearing Stress
Bearing properties are forces acting on the hole a bolt goes through. A bearing test is to determine if there might be any deformation of the hole. Preloading will reduce bearing forces, but not all bolted joints are preloaded. To calculate bearing stress, divide the force over the contact area between the fastener and hole. Theoretically, it is often the simple area of the bearing surface.
δb=P/Ab
where:
δb = bearing force
P = Axiel forces acting on the fastener or plate
Ab= bearing area
Depending on the clearance between the fastener and the hole, the bearing area could be the length of the contact area multiplied by the diameter of the hole. If there is clearance, multiplying the answer by Pi divided by four will be more accurate.
Neither of these equations takes into consideration that the stress is not distributed equally across the diameter of the hole. Stress distribution is closer to an ellipse, with more force in the direction of the axial force. Adding more fasteners reduces bearing stresses by increasing the area over multiple holes.
Calculating tear-out is similar to other stress equations (force divided by area). However, unlike some others, you can choose at what point you calculate the area. Tear-out area is sometimes taken from the center of the bolt hole to the outside of the materialâincreasing the area by the radius of the hole. A more conservative approach is to take the area from the edge of the bolt hole to the edge of the material.
Shear Stress
For bolted joints without a preload shear, stress is calculated like bearing stress: force over area. Like bearing stress, it is also an average stress and the maximum shear will be higher. If a bolted joint has no separation or clearance, a direct shear situation—shear without bending—can occur.
τ = V/Ashear
where:
τ = Shear stress
V = force
Ashear = Area in shear
Direct shear is ideal, as it reduces or eliminates extraneous stresses and slippage. However, even preloaded joints may be subject to excessive loading, impact loads or creep that would reduce a preload and may cause shear with bending. Sometimes called a transverse load, this is defined, generally, by the pre-derived equation:
This is still a simplified way of designing a bolted joint. Keep in mind that it is important to understand any and all potential loads and how they will act on the joints. A bending stress on a beam can increase tensile and shear stresses on the bolts. (For a way to visualize bending in a beam, see “What’s the Difference Between Beam Diagrams?”).
Tear-Out
Tear-out is a type of shear. Instead of shearing the bolt, the force will shear the material surrounding the hole. To prevent tear-out, it is suggested that the distance from the edge of the material to the edge of the hole be at least equal to the diameter of the hole. Edge-to-hole diameter ratios ranging from 1.5 and 2.0 are common.
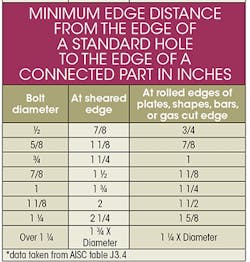
The AISC J3.4 roughly follows a 1.5 ratio where the AISC J3.5 indicates the distance from a bolt hole to the edge of the material should be 12 times the thickness of the connected part, but not more than 6 in. For the distance between bolt holes the distance is 24 times the thickness of the thinner body/part, but not more than 12 in.
Stress concentrations can dissipate relatively quickly, but the distance to the edge of the material or another stress concentration could induce tear-out stresses. The same edge-to-hole ratio may provide an idea of spacing between bolts holes, too. It is important for a company to define which standards and equations they want the engineers to follow so joints are designed uniformly and minimize variation.
There are resources online, such as distance calculators. Ideally, they should show how they are being calculated or what standards they are following. If they don’t, simply use them as estimates or something to check your work against.
Margin of Safety
The safety factor will change based on the tension on the fasteners, strength of material, etc. Using preload will reduce shear and bearing forces, as the movement in the joint reduces through friction or compressive forces. (To find out more about how external loads affect the elastic center of the fasteners, see “How Bolt Patterns React to External Loads.”)
Safety factor and the margin of safety can be changed to provide a preload. Note that this normal force will change the margin of safety. There are many equations for safety factors and margins of safety. The following is to show that the allowable stresses are generally divided by the actual stresses. If you are designing something to be lightweight and the margin of safety is close to zero, but you didn’t factor in the preload, the joint might actually be lacking a factor of safety.
MS = (tA/Pb)-1
where:
MS = Margin of safety
tA = Tensile allowable
Pb = Total axial bolt load
For the shear margin of safety, simply swap out tensile and axial for shear. For combined bending and shear you can be left with:
where:
Rb = Total axial bolt load/bending allowable
Rτ = (Safety factor*force)/shear allowable
Some calculations will include the preload value, where the tensile force on the bolts is multiplied by the total of the square root of the shear and bending forces. Different companies have their own equations they have honed over years of experience. Without this experience, finding experts or expert reference material is important when designing a bolted joint. They aren’t as simple as your introduction to statics course in college might have made you think.


