From Napkin to Final Product, One PCB Design’s Journey (Part 1)
Maker-Pro
Ever hear the term Maker-Pro? It’s a label attached to practicing engineers who are also “Makers” on the side—i.e., building projects at home. We apparently can’t get enough of engineering during the workday; we have to do it all the time. According to a USA Today article from 2013, some 135 million U.S.-based Makers generated more than $29 billion that year alone!
This file type includes high resolution graphics and schematics when applicable.
Isn’t a Maker-Pro very similar to a hobbyist? Yes, but Maker-Pros set themselves apart by trying to capitalize on their side-project work in a financial way. We are all Maker-Pros at heart. All engineers have ideas, and we all want to branch out on our own. However, some might need a little inspiration and direction to get started.
In this article, I set out to do just that: Create an electronic-something bound for the open market.
My idea stems from a necessity, like most. I want to quickly and easily add custom switch-activated inputs to any system that can accept a keyboard. Essentially, I want a keyboard without keys—a Keyboard Breakout Board (KB Breakout) would be a more apt description. Although this has limitless input sensing possibilities, my original purpose is a bit more humble.
Background on the Inspiration
Remember video game arcades?
Let’s go back 20 some-odd years ago. This was a pre-internet age, so I couldn’t play against anyone online or read about competitions beyond my local arcades.
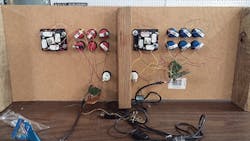
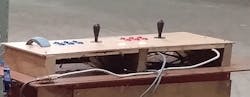
I wanted to practice at home. I took a journey to the arcade and measured every single feature of the arcade fight sticks: Distance of all the buttons from one another, between player one and two, size of the table they were on. I returned home and built as close of a replica of the arcade as I could. I even sourced real arcade components for my two-player controller. Unfortunately, I was forced to cannibalize two Sega Saturn controllers in a kludged-together way of interfacing my arcade components, soldering wires to the controller button traces. Not fast, and not at all ideal.
More than two decades later, here I am with an old idea in a world of easier-to-use technology.
The Design Requirements
It’s at this point, the beginning, where you start working on the design requirements. Mine were fairly simple.
1. The KB Breakout board has to act like and be seen as a regular keyboard on any system you plug it into. This includes PCs, Macs, Linux computers, and any single-board computer (since they are gaining in popularity in the emulation world).
2. The user won’t need to install drivers on any of the above systems that the KB Breakout plugs into.
3. All inputs on the KB Breakout will be labeled. The user won’t have to configure buttons.
4. Each input will be a single pin with a corresponding ground pin next to it.
5. Mounting holes will be in the corners, where a back-plate can be attached. From there, the user can attach rackmounts adapters or whatever way they want to attach the board. I can see people using rackmounts inside their custom arcade cabinets.
6. It will be as small as I can make it.
Research into Keyboards
Digital keyboards are as old as computers, mainframes, and complex number calculators, with roots stretching all the way back to typewriters from the late 1800s. Keyboards as we know them now began in the 1970s. A decade later (1986, to be precise), IBM released a computer with the legendary mechanical keyboard, the “Model M.” To some, the Model M remains the one and only keyboard to use. I will elaborate more on why later on, and touch on the mechanical keyboard community.
These keyboards featured a matrix of mechanical switches to represent the keys. Later, mechanical keys were replaced with membrane contacts bridging two contacts, acting as the switch. Either way, how it works is that all rows and columns of the matrix are scanned. When a column shows a logic low, the rows are scanned for the same (or vice-versa, depending on which are connected to the input of the keyboard’s microcontroller). Once the two are found, the system knows what switch was activated.
There is a matter of checking the debounce time, the validity of a key press, and the duration of the press, but that is going further into the core basics of how a keyboard works. Let’s take it up a notch.
Ever have to clean out your keyboard and inspect the PCB while it’s taken apart? For those who never have, you often won’t see what exactly is driving the keyboard. I found that in five different off-the-shelf keyboards, the main processing chips were potted or encased inside a non-standard shape. No labels.

I was lost. Did I really have to reinvent the keyboard wheel?
At this exact time, no kidding, my father and I were already buying different types of mechanical keyboards to use for typing (mechanical switches, as opposed to rubber dome-style contacts). My father is the real author; I just type a lot. Either way, we were looking for a better key feel when typing. I would love to bore you with an explanation of the various types of mechanical switches, manufacturers, and support parts, but I’ll hold back. Just kidding, I’ll give you one: Most people with mechanical keyboards also buy o-rings to put on the key’s stem to dampen the key impacts and shorten the keystroke. But, there are different size o-rings and different durometer ratings.
Through this obsession with mechanical keys, I delved deeper into that world and the do-it-yourself (DIY) scene that came with it. Those hoping to build the perfect keyboard often use open-source software in their builds. The driver software, I have noticed, derives from the Kinesis Advantage keyboard, among others.
Through here, I found what people have done in the past code-wise. I also found other open-source resources to aid me in building the first prototype KB Breakout.
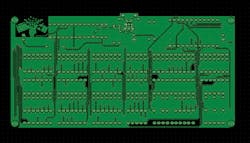
The Tools and the Layout
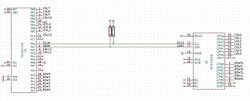
For lack of a better PCB layout program, I used KiCAD. It’s open-source—what’s more to say about it? I took plenty of pointers form those who built keyboards before me. I started with an 8-bit AVR microcontroller, which seems to be popular in the DIY keyboard community. This chip is featured on a “Teensy 2.0” development board, which breaks out the 25 digital I/O pins rather nicely. The best part is, the Teensy can run Arduino Sketches, and there is a lot of open-source support in that community.
In retrospect, I should have picked a Teensy++ 2.0, which has 46 digital I/O pins. It would have saved me from needing an I/O expander IC on the regular 2.0. From here, it was rather straightforward: making a keyboard. Which I did, except I changed the regular keyboard switch locations to single pins.
For the prototype here, I grabbed a few other ideas (secondary USB port, mainly). I thought about adding some status LEDs, or even a small LCD, but I figure no one will look at this board when it is in use—it’ll be inside a cabinet. A keyboard is surprisingly simple in its layout.
A Board Symbol?
While I was working on this board, I had written an article (well, slideshow) about artistic PCBs. These PCBs are either on odd shaped PCBs, or the traces are used to great artistic effect. I was completely captured by one in particular called Substrate Girl. Talk about recognizable: See it once, and you never forget. I wanted a cool picture for my board, too.
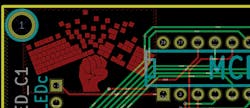
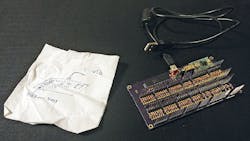
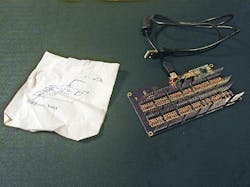
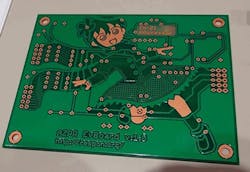
I imagined a fist punching a keyboard in half. (Get it? Keyboard… Breakout… board?) I drew the idea in an evening. I wanted it simple and to the point: a flat keyboard and a fist. I will admit, I took inspiration from the Unity Fist design, but drew my own…making it a right hand and a cartoony version of my own. After finishing the sketch, I digitally traced in in Adobe Illustrator. I moved the keys around for the smashed effect. Cool logo, would be awesome on a T-shirt for sure.
But here’s the sad part: While I’d wanted it in the space in between the traces and pins, it interfered with the labelling of the pins, and the board was already pretty packed. I could put it on the bottom, but no one would see it. So I scrapped that idea and placed it into the upper left corner.
So, that covers the design concerns. In our next installment, I’ll touch on the process of finding a PCB manufacturer.
Looking for parts? Go to SourceESB.
This file type includes high resolution graphics and schematics when applicable.
About the Author
Cabe Atwell
Engineer, Machinist, Maker, Writer. A graduate Electrical Engineer actively plying his expertise in the industry and at his company, Gunhead. When not designing/building, he creates a steady torrent of projects and content in the media world. Many of his projects and articles are online at element14 & SolidSmack, industry-focused work at EETimes & EDN, and offbeat articles at Make Magazine. Currently, you can find him hosting webinars and contributing to Penton’s Electronic Design and Machine Design.
Voice Your Opinion!
To join the conversation, and become an exclusive member of Machine Design, create an account today!

Leaders relevant to this article: