Many freshman college engineering courses will walk through the different types of materials and processes in manufacturing. Understanding how materials behave in different processes can help make the decision on how to scale production for a design. For example, if titanium will suit the specs of a design, but the easiest process is to cold draw the part, it would be wise to try to keep things simple by finding another material or process.
By investigating parts, students learn about what they are made out of and how they were made. A dead giveaway for 3D printing is its ridged layers. This rough surface finish is commonly associated with the fused filament fabrication (FFF) process. However, with the right post-processing, a part can better hide its manufacturing origins. For example, a 3D printed part can be smoothed to resemble an injection-molded part.
How to Smooth Your Part
Sanding might be the foremost and easiest process, and it works well. Before you print, though, there are some steps that might help the finishing process. If a part is for fit or has geometric dimensioning and tolerancing (GD&T) requirements, you may need to add material to these features so that they are not sanded out of spec. In addition, you might want to consider increasing the resolution by reducing the layer height. While this will increase the print time, it will save time spent on sanding. Finally, be aware of your shell thickness. The last thing you want to do is sand through the shell.
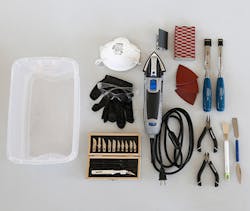
MakerBot suggests having this equipment to remove supports and to sand your 3D-printed part. For more information, check out their guide here.
Once you optimize a part for sanding, use cutters, pliers, etc., to remove all supports and larger sections of material. Next, power sanders with heavy grit (around 80) can help knock down those stepped layers and give it a uniform surface. Be careful not to get too overzealous, just knock down the edges and get a consistent surface. You may run through a few grits to get this to a semi-smooth surface.
If the part is to be painted or intended to be a show piece (i.e., needs to compete with an injection molded part’s surface finish), try wet sanding with 400 grit paper. Again, you may want to use a few grits between 400 and 1,000. Think of it like doing body work on a car—if you want that smooth gloss finish, you don’t want any bumps to be visible.
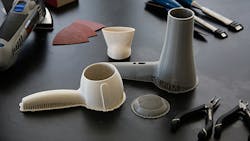
While sanding is inexpensive, it does take time. In a guide provided by MakerBot, it took about three hours to prepare this hairdryer for paint. If the average shop tech is making around $15 per hour, that’s $45 just for sanding. (Credit: MakerBot)
Note: If the part is for an assembly, minimize sanding on the surfaces that will come in contact with other parts to reduce the amount of filler needed in subsequent processes.
Vapor Smoothing
A simpler and easier way to accomplish a high-level surface finish with less elbow grease will require a little bit of practice and ingenuity. Vapor smoothing needs some equipment, but if you are safe, it is possible to perform this technique with simple materials that can be found around the house. Check out this video on how to use vapor smoothing at home:
Some of the highlights are that not all filaments are the same. When using this method, you might want to test a piece of filament first to see how it dissolves before using a part that took a few hours to print. Lower-quality filaments can dissolve unevenly, resulting in a poor surface finish. In addition, testing a piece of filament may also give you an idea on how much time it might take for the materials to start to dissolve.
Watch the video for details, but in short, the video seals the model in a see-through container with paper towels wedged at the top that is wetted with acetone. It is important to remember to remove the model when the smoothing effect starts, or perhaps halfway through if you are able to make an educated guess. This is when the container should be lifted, exposing the model to air.
The early cutoff is because the model will continue dissolving after being removed from the vapors. It can also help to have a small fan in the container to move the vapors around and keep them from settling on the bottom. If you have a tall model, it is possible that the bottom might see more smoothing than the top. With appropriate equipment, this process can be controlled and will dissolve about 2 µm of the surface. If executed properly, the process can yield an almost injection-molded-like surface finish.
Bead Blasting
This method can be faster than sanding. But, if you don’t have the equipment, it is hard to create a do-it-yourself process at home like vapor smoothing. If you do happen to have this equipment, you probably know how to use it. For more information, check out the article "How to Smooth 3D-Printed Parts."
Adding Inserts
While certain materials and designs make it possible to 3D-print living hinges and clips, expectations for such parts being long-lasting can be in jeopardy because these features may succumb to fatigue. To achieve the goal of having a long lifetime, a better option is to use metal threaded inserts.
Before printing, you might want to increase the shell layers the inserts will press into, to offer more material and strength. This is especially important if you plan to drill and tap into the part directly.
Oftentimes, 3D-printing holes can be slightly undersized because of the geometry and the process. However, this could be handy for inserts. When buying your threaded inserts, the suggested diameter size for the model should be given. Since the inserts will be melted into place if the diameter is slightly tighter than needed, it may not cause an issue.
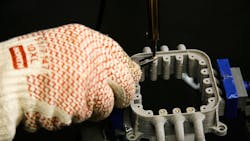
In a guide from MakerBot, it shows How to Install Threaded Inserts into Your 3D Prints. (Credit: MakerBot)
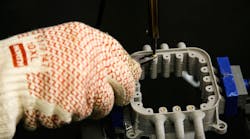
Inserts can be installed with a soldering gun and needle-nose pliers. Be careful when heating the insert. If the metal is overheated, it will melt the material away, making the hole too large. To prevent overheating, try using the pliers to hold the insert in place while using the soldering iron to push the threads into place. Once it looks like the insert has started to melt into place, remove the soldering iron from the insert. Then, apply the soldering iron to the thread again. Gradually push the insert in a little more each time when you add heat.
Note: Make sure the inserts are square to the surface that it’s being mounted on.
With the part smoothed and inserts installed, it is time to assemble, glue, fill, and paint. Gluing the parts together, if it’s an assembly, can be done relatively easily. Gluing subassemblies with a two-part epoxy will provide time to adjust the parts before it sets up fully, and create a strong bond.
When gluing larger assemblies, you can hold the part together with rubber bands, clamps, or straps. Using Super Glue, you can join parts quickly. Once all of the surfaces are joined, you can use filler, such as Bondo, if you plan to paint the model. MakerBot offers guides with more detail on how to glue, fill, and paint, but the part is done!
From this simple example, you can see how post-processing can be time-consuming. Therefore, printing parts as a single piece, reducing layer height, and leaving some extra shell layers might help reduce the time. Depending on what is desired in a model, it might be better to select another process, such as stereolithography or multi-jetting, that can offer higher resolution, multiple colors, and other features.
Knowing what processes and materials offer what benefits and limitations is still as important now as it ever was. With more processes and materials continuously arriving on the market, absorbing the knowledge from that simple introduction class on materials and processes will only become more important.


