From the buildings we work in, the data centers we depend on, and especially in the machines we design, we inevitably rely on bolted joint connections. Unfortunately, due to the perceived simplicity of bolted joints, they can be a commonly undervalued subsystem. The irony is that problematic bolted joints can and do break down, even in the most finely designed machines.
All too often, machine designers fail to consider some fundamental aspects of bolted joints, creating a variety of issues that plague equipment. Making matters worse, suggested solutions to correct the joint don’t always address the root cause. These misguided corrections add a level of complexity that often obscure the original cause. In all the confusion, these extra and unnecessary steps have inadvertently introduced some fat into a process that would be better off “lean.”
The Adaptation to Lean
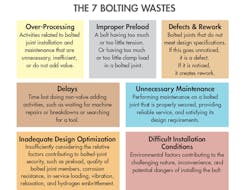
In the pursuit of world-class bolting, businesses can learn from world-class manufacturing. Just as there are the Seven Manufacturing Wastes within Lean Manufacturing, there are Seven Bolting Wastes within Lean Bolting. The seven bolting wastes undermine value in the design, use, and maintenance of bolted joints. The analysis, identification, and elimination of these wastes increase the likelihood of economically meeting a project’s design goals.
The seven bolting wastes can exist at any point during the lifecycle of a fastener, and it is important to evaluate new perspectives with an open mind when searching for bolting wastes. During such an examination, it is best to not get caught in the “we’ve always done it that way” trap. One lean technique that can help here is called the 5 Why’s. The purpose of this technique is to determine root causes. The concept is simple; when a problem arises, define it. Once defined, ask “Why” the problem occurred. Then, once you’ve figured that out, ask “Why” again. Repeat this process at least five times, or as many times as it takes, to get to the root cause. If you correctly identify an issue’s root cause, reliability and quality can be more easily improved.
Lean Manufacturing
Lean manufacturing is an outgrowth of the Toyota Production System developed in Japan throughout the 20th Century. Toyota proposed that the best way to enhance the value of its products was to methodically minimize or eliminate waste from the value stream. The value stream is the series of processes (supply chain) that connect raw materials to the products shipped to customers. Toyota determined that the customers would be unwilling to pay for non-value adding activities within the value stream. Toyota’s goal then became to provide customers with the highest quality products at the lowest possible cost.
Here is a deeper look at each bolting waste:
Over-processing. When evaluating a bolted joint for over-processing, list all of the steps used to install and maintain it. Common steps could include cleaning the joint, applying a thread lubricant, calibrating the torque wrench, torque striping, and conducting maintenance. The next step would be to ask “Why are we doing each of these steps? Is each one absolutely necessary or could it be waste?” If waste is identified, strive to eliminate it by breaking down the design, installation, and maintenance process into the least amount of steps necessary without compromising quality. Successfully executing this activity will bring significant efficiency and valuable improvements.
Improper preload. The primary means by which bolted joints provide security is through proper preload. This makes improper preload an important waste to manage. Improper preload does not just mean not enough tension; it can also mean too much tension. Excessive preload can lead to stripped threads, bolts yielding and fracturing, or crushed joint components. In contrast, insufficient preload causes self-loosening, fatigue failure, and loss of dimensional consistency in the form of separation or slipping.
Regardless of prevalent industry confusion, improper preload does not mean improper torque. Torque is, unfortunately, a common misnomer for bolt tightness. Torque is a rotational force (not compressive) that does not provide joint security. In fact, over-reliance on the predictability of the torque-tension relationship is one of the most common causes of improper preload.
Defects and rework. When combating defects and rework, it is necessary to have a method of identifying defective assemblies. Although it is ideal to eliminate both defects and rework, it is better to have rework than defects; rework provides an opportunity to correct the issue, rather than have it cost more time and money in the future. In this context, defects can be considered as any bolted joints that go into service without meeting design specifications. It is good practice to use robust design techniques so that it is easier to meet critical-to-quality metrics. Choosing to “build in” quality significantly reduces operation and maintenance costs associated with the joint in-service. A poka-yoke strategy (Japanese for “error-proofing”) can be a great way to prevent defects and minimize rework.
Delays. Delays—on the scale of minutes, days, or even months—can be quite common if you’re not careful. The longer the delay, the more expensive it becomes. Major equipment failures can wreak havoc on operations that can rarely afford lost time. Nevertheless, minor delays hurt profitability as well, especially when they get a chance to accumulate through repetitive processes. Having to double-check or rework a joint installation can push schedules back, making it worthwhile to get the assembly right the first time. Properly securing bolted joints at initial installation and efficiently monitoring their security in-service significantly minimizes delays due to malfunctions.
Unnecessary maintenance. This waste is not always easy to identify, so it is good to start thinking about maintenance during joint design. The key here is distinguishing between necessary and unnecessary maintenance. Companies want to focus on joints that need maintenance, not those that don’t. The most common need for joint maintenance is to ensure there is sufficient residual preload. Labor intensive techniques such as “torque-checking” have become commonplace but can provide inaccurate results.
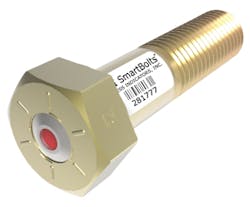
“Torque check” maintenance is a good example of waste because significant time and effort must be spent checking every bolt—even ones already properly secured. Ultimately, reducing this waste comes down to having in-service monitoring of bolted-joint clamp force, and only a handful of technologies can do this. One of the best is to use tension indicating fasteners. These fasteners indicate the tensile force developed during installation, as well as the residual load on the joint while in-service. Some tension indicating fasteners (such as DTI SmartBolts from Stress Indicators) offer a visual indicator which allows for rapid inspection and identification of bolted joints that require maintenance, letting companies minimize unnecessary maintenance.
Inadequate design optimization. This is the broadest of the wastes. Bolted joints are exposed to a wide spectrum of environments. From extreme temperatures, heavy vibrations, and seawater to mud and grime, high vacuum, and acidic exposure, the joint must be designed to withstand all relevant factors. As many design factors as possible should be identified and combatted through smart design choices. For instance, the pairing of tension indicating fasteners and wedge lock washers are a powerful combination for developing, maintaining, and monitoring preload in high vibration environments. It is also important to select quality components evaluated for compatibility with one another.
A common mistake is to use low-strength steel washers with high-strength nuts and bolts. This can cause significant relaxation of joints as the washer yields under the increased clamp loads. Another simple example would be selecting a bolt that is too small and without the needed strength. However, selecting bolts that are too large can also significantly increase costs as tool size and installation times rise. An often-overlooked aspect is a bolt’s length-to-diameter ratio. Strength requirements aside, the higher the ratio, the more elongation stored during loading. This reduced “stiffness” becomes important when trying to maintain preload in softer joints. Selecting the largest practical length-to-diameter ratio helps preserve bolt preload and fatigue resistance.
Difficult installation conditions. Troublesome installation conditions are some of the most challenging wastes to control. Installation conditions can be as controlled as an air-conditioned lab with excellent lighting or as difficult as subsea maintenance requiring scuba divers. Regardless of how difficult installation might be, standard operating procedures should be evaluated in terms of feasibility, practicality, and, most importantly, safety of installation. Although many costs associated with installing bolts under challenging conditions are unavoidable and do add some form of value, it is necessary to weigh how better tools and methods might improve operations.
Lean Bolting in Practice
In application, systematically eliminating wastes from bolting processes leads to improvements. Let’s take an example from industry: A Tier 1 injection molding company struggled to consistently secure large molds in their presses. The company wanted a better way to protect machine operators and equipment.
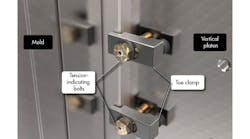
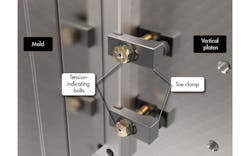
One major concern was determining how many toe clamps were needed to properly secure the molds, according to the tooling manager. The number of clamps used depended on recommendations from the engineering department, and it based its recommendations on the mold’s weight and access points available on the mold. If a mold couldn’t be clamped in an ideal place, additional toe clamps were used to compensate. In addition, stripping out the threads of the unhardened platen was frequent because high strength bolts were used without adequate thread engagement. Fluctuations in mold thickness, clamp type, and bolt lengths made it difficult to control engagement. Furthermore, impact guns and torque wrenches were used interchangeably to tighten bolts. The factory operated 24 hours a day and the company wanted more efficient operator rotations. On top of this, molds still slipped out of proper position.
After observing the mold changeover operations, it became apparent there were a number of steps to examine:
- A gantry crane lifting heavy molds in and out
- The injection press temporarily clamping the mold during installation
- Setting up and adjusting mold-toe clamps and bolts
- Connecting cooling lines
- Releasing the press’ clamp after toe clamps are fastened
Next, the seven bolting wastes were used to evaluate and troubleshoot the connection.
Over-processing. Due to concern for mold slipping, technicians would use more clamps than specified to ensure security of the mold. Although this sounds reasonable, it nevertheless represents a waste because of the additional time and tooling needed.
Improper preload. Bolts were suffering from both insufficient and excessive preloads. It was convention to specify a torque value based on the bolt diameter, but with only torque control available, improper preload was widespread. Also contributing to improper preload, an impact gun would be used in the absence of a torque wrench. Impact guns struggle to provide both adequate tension control and torque control.
Defects and rework. When a technician would strip the platen, the machine would have to be stopped. The stripped hole was then drilled out and retapped, and a helical threaded insert used. The changeover process then had to start over. The inability to properly set up and secure the mold the first time created rework.
Delays. The time needed to repair the platen created significant delays in getting the machine operational. In addition, time was often wasted searching for properly sized torque wrenches.
Unnecessary maintenance. During changeovers, new operators were commonly expected to recheck the mold bolts by tightening them a second time. This was likely waste as secure bolts were double checked. Also, in the serious but rarer event of a mold slipping, it could be damaged and require unscheduled maintenance. If the mold had never slipped, the maintenance would not have been needed, making it preventable and thus unnecessary.
Inadequate design optimization. An opportunity for optimization was in the mold clamp hardware. For example, several types of toe clamps were in use, and technicians would browse through a mix of bolts of different lengths and a variety of different-sized washers to select what they thought were best. In some cases, they found out the hard way that the bolts they chose were not long enough to ensure enough engagement and they stripped the threads. Furthermore, improperly-sized washers caused the bolt head to gouge the washer face, further distorting the torque tension relationship.
Difficult installation conditions. The hazardous environment of working between movable platens and a 20,000-lb. mold led technicians to minimize the time spent inside the machine. The tight workspace was often coated in oil and heavy molds were frequently lifted overhead.
As a result of the bolting wastes evaluation, the company determined that tension-indicating fasteners would be a lean solution. DTI SmartBolts let the tooling manager set a specific tension value suitable to the application. The SmartBolts would signal a “tight” black color when proper preload was achieved. If preload was lost, the indicator displayed a bright red “loose” signal.
Once in use, technicians could now be confident the right amount of clamp load was being applied, so extra fasteners were unnecessary. This directly solved the 2nd bolting waste of improper preload. Because SmartBolt accuracy does not depend on torque, they can be installed with a breaker bar, torque wrench, or impact gun. In fact, impact guns can be adjusted to the right pressure based on the bolt’s visual indicator. Correcting defects and rework required a discussion on thread engagement. The company adopted the rule of thumb that at least one diameter of thread engagement is needed for steel and 1.5 diameters of engagement for aluminum. Improving standardization among clamps, washers, and bolt lengths was also recommended through a “5S” program. (5S is a workstation organization method consisting of Sort, Set in Order, Shine, Standardize, and Sustain activities.)
Now, with proper thread engagement and preload control, thread stripping and bolt breakage were dramatically reduced. The delays experienced were also reduced by eliminating the risk of thread stripping and the need for torque wrenches at final installation. Operator changeover time was reduced by using SmartBolts’ visual indicators. The visual indicators acted similar to an Andon, a system used in Lean Manufacturing to alert maintenance staff of problems on the line. Finally, rapid inspection of bolts by new shift operators minimized time spent between platens, helping to provide a safer and more efficient work environment for all employees.
Christopher Bunai, Chief Engineer
Stress Indicators, Inc., Gaithersburg, MD
Looking for parts? Go to SourceESB.


