Fine Tuning Parts Design Saves Time and Cost
While a part’s design may meet all the right functional requirements, that doesn’t mean the design is suited for cost-effective CNC machining. In fact, some part features may be difficult or even impossible to machine as designed, which impacts cost, quality and yield problems.
Using a practice known as design for manufacturability (DFM) can identify some key drivers of machining time and cost:
- Tolerancing. It’s easy to specify overly tight dimensional tolerances, increasing production time, reducing yields and driving up costs.
- Feature sizes. You’ll want to make sure your part features can be manufactured using standard, rather than custom, tools.
- Surface finish. Designing parts with a finer surface finish than what you need will lead to costly, inefficient CNC production.
- Radius, chamfers, crossholes and deburring. How your part’s edges are broken around holes and other features affects cost—making part radii, chamfers and crossholes important variables to consider during the design process.
- Contours. Just because a part can have many contours doesn’t mean it should. Simplifying a part so it can be made using a three-axis machine, rather than a five-axis machine, will put money back into your pocket during production.
- Inspection. It pays to tweak part designs to facilitate inspection processes — making this variable an important, yet subtle part of the design process.
Dimensional Tolerances
When overly tight, tolerances can easily drive up production time, lead you into more costly machining territory and reduce your yields. That’s why it’s always a good idea to ask yourself if a part really needs the tightest of tolerances from a functional standpoint. If the part does, then we’re equipped to handle even the most demanding of tolerances. But if it doesn’t, then loosening the tolerances where appropriate can drastically improve the part’s machinability in terms of time and cost.
Tolerances refer to the acceptable amount of dimensional variation that will still allow an object to function correctly.
They can apply to the nature of a part’s form, whether flat, straight or circular, or to location, whether symmetry or concentricity. Other types of tolerances include feature orientation, profile and runout.
The drawbacks of overly tight tolerances boil down to time and cost. For example, at a certain dimensional threshold, hole sizes will require custom or specialized tools, adding cost. Or the machine shop may have to switch from machining to electrical discharge machining (EDM), jig boring or water jet cutting to hit the tightest hole size specifications, adding time and skilled labor costs.
Even if the tolerances are functional, the manufacturing process itself can introduce challenges, leading to low yields and additional costs. It’s not uncommon for a machined part to meet tolerance on the warm shop floor but see cooler temperatures during inspection throw the part out of tolerance.
Real-World Examples
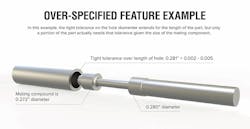
One example of a part with overly tight tolerances is a spider pack, which is part of a rod cluster control assembly for nuclear power plants. This component consists of 24 legs, each of which features a hole with a dimensional tolerance of 0.280 inch—plus or minus half a thousandth. To put these numbers into perspective, the spider pack must include tolerances that are eight times tighter than a strand of human hair.
Even if one tolerance is off by a tenth of an inch, the part must be scrapped. Making matters even more challenging, the spider pack consists of 24 holes, leading to very high scrap rates and inconsistent delivery times—both of which significantly drive up manufacturing costs.
On an aerospace component that will be sent to the moon, the task was to reduce weight by cutting out pockets with a tolerance of plus or minus 5 millimeters. These pockets served no other functional purpose than to reduce overall part weight, which begs the question: Why pay more for such tight tolerances?
It’s always a good idea to consider if a part’s tolerances need to be so tight. Many down-the-line manufacturing issues related to tolerancing can be easily avoided if addressed during the initial design phase. In many cases, taking the part back to engineering once it already hits the shop floor will prove too costly an endeavor.
Avoid Custom Cutting Tools
Dialing in tolerances is just one of the many ways to fine-tune part designs for efficient machining. A related manufacturability issue has to do with designing part features whose dimensions require the use of custom-sized end mills and other cutting tools. Holes, grooves, radii and chamfers are all examples of part features that may require a costly custom cutting tool if the feature’s callout dimensions don’t match a standard-sized tool.
A recent part had a 0.18-inch radius, but standard three-eighths-inch end mills have a 0.1875 radius. Are these 0.0075 inches important enough, from a functional standpoint, to trigger the added expense and lead time for a custom end mill?
In another example, an order for a part with a 0.188-inch corner radius was required to hit a depth of 1.900 with a 0.375-diameter tool. This radius would not interfere with any holes or other functional property, but it would require many slow step-down cuts to get to this depth. After going back and forth with the part’s design engineer, the radius was increased to 0.260 inches, which allowed use a 0.500 endmill to full depth with next to no push off and in one third the time—saving the customer the cost and lead times of procuring the custom tools.
Why Engineers Go Custom
So why the unusual dimensions? In some cases, the culprit is an “exact copy” mentality where dimensions from earlier cast parts or prototypes are carried through into the production drawings. Other times, it’s a metric conversion of the called-out feature dimension. Standard cutting tools are available in metric, not just in U.S. Imperial sizes. In these cases, it pays to give the machine shop the drawing with the original metric measurements, rather than wasting time and energy to convert the callouts to something that may not correspond to a standard U.S. tool size.
The consequences of calling out feature dimensions that won’t work with standard cutting tools can be significant. Some of that cost is the price of the cutting tool itself, which can be exacerbated by the fact that custom-sized tools tend to break and wear prematurely. Then there’s the opportunity cost associated with longer lead times to get your parts.
There also is a hidden cost to special feature sizes that may be less obvious: Features machined with standard cutting tools can often be inspected with simple gage pins and similar inspection tooling. Features produced with non-standard cutting tools may need a trip to the coordinate measuring machine, adding to the production costs and lead times.
If the part has features that require a custom tool to meet functional requirements, we can make just about anything you want to put on the drawing. But it’s worth investigating, early in the design process, whether there are features whose dimensions can be eased to match standard tools without interfering with the functionality of the part.
Surface Finish: A Balancing Act
While it’s clear that over-specifying certain part features—such as dimensional tolerances, grooves, holes and radii—will drive up production time and costs, surface finish can be a different story. While it’s true designing a part with a finer surface finish than needed can lead to inefficient and costly CNC machining, The opposite occurs more often.
Our experience at L&S Machine Company is that the surface finish specified on a drawing does not always reflect what a customer wants. For example, a 125-microinch Ra surface finish will appear smooth to the naked eye, while a 250-microinch Ra finish will appear rougher. And whether for aesthetic or functional reasons, customers come back because they want the surface to be smoother.
Although the drawing may indicate 250, what the customer really wants—and expects—is 125 or smoother. This is especially true for part features like water holes. And in many cases, this back-and-forth will drive up production time.
On the other hand, it’s important to remember that the finer the surface finish, the more labor will be required to achieve it. For this reason, overspecifying finishes can also increase time and cost. For example, while it’s easy to hit 125–250 surface finishes with water jets and CNC milling, achieving smoother surfaces will require more specialized tooling or bench work, translating to significantly higher costs.
While it’s important to know what you want in terms of surface finish before working with your machinist, the best machining companies will ensure they deliver what you’re looking for up front.
Dave Smathers is general manager at L&S Machine Company.


