Using Coiled Spring-pin Hinges
This file type includes high resolution graphics and schematics.
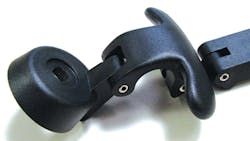
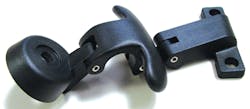
Engineers working on everything from laptops to cosmetic cases to glove boxes commonly use coiled spring-pin hinges because they can tailor them to their designs. They can adjust the “feel” of how a device opens and closes and how far it opens, which affects consumers’ opinion on the device’s quality. Designers can choose between friction-fit versions that hold a position or free-fit hinges that let components swing freely. For example, the hinges that join a laptop display screen to its keyboard are usually friction-fit versions. They hold the screen in any position and do not let it move, regardless of how the laptop is held.
Hinges generally consist of two or more components that rotate relative to each other about a shared rotational axis. There are several types of hinges, and they can be manufactured from materials ranging from thermoplastic and thermoset plastics to various metals. Although some hinges do not use pins as rotational axes, they are typically limited in performance and durability, more prone to failure, and intended for shorter-lived applications such as the lid on a Tic Tac case.
Let’s take a closer look at how engineers can get the most out of coiled spring-pin hinges.
Coiled spring-pin basics
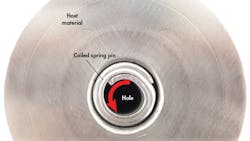
It is important to understand how coiled spring pins function. They are formed from a strip of material rolled into coils — typically wound 2.25 times. The pin’s outer diameter should be larger than the diameter of the hole into which it is installed as this creates friction. Engineers can adjust this friction by changing the pin diameter or the size of one of the holes the pin goes through.
The pin material does not exceed its elastic limit during installation, so it exerts tension on the walls of the hole as it tries to expand back to its preinstalled diameter. The inner edge of material can coil inward when the hinge rotates or is subjected to vibrations or shocks.
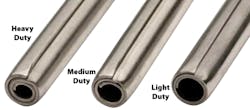
Coiled spring pins come in light, standard, and heavy duty, which refers to the thickness of the material used to make the pin. Light duty uses the thinnest gauge material and heavy duty has the thickest.
Light-duty pins are flexible and work well in plastic hinges. Hinges made of unhardened steel usually have standard-duty pins. And heavy-duty pins are used for hinges made of hardened steels.
Using a pin with the wrong duty is a common cause of walking or lateral movement. And installing too rigid a pin in a flexible or easily damaged host material can deform the hole, which can causes the pin to become tapered as the hinge is used over time.
Adjusting friction
In a free-fit hinge, the pin is held tightly in one or two retaining holes sized so as to not let the pin move. Outside of the retaining holes, the pin passes through a larger hole in the opposing part. (Experts recommend the nonretaining holes be at least 0.002 in. larger.) This means the hinge will swing freely. If it does not, increase the diameter of the middle hole in increments of 0.001 in. until it does.
Coiled spring pins can also be used in friction-fit hinges. Holes in both components have the same diameter and are sized so that the pin is always in contact with the sides of all the holes. This contact creates the friction and it can be adjusted by specifying the size of the pin and/or holes.
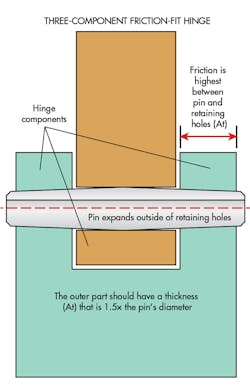
To prevent the pin from moving laterally or walking, engineers can exploit the tendency of coiled spring pins to uncoil and get wider the farther they extend beyond a retaining hole. The amount the pin expands depends on several factors: pin length, diameter of the pin, stiffness of the pin material, and length of the unsupported section of the pin.
Making the hole through the middle component slightly larger lets the pin expand, locking the pin in place laterally and preventing it from working itself out of the hinge holes.
For a friction-fit hinge, there must be spring tension and, therefore, friction, between the pin and each hinge component. But that frictional force is typically greater on one component than the other. So when the hinge rotates (that is, torque applied to either component), the pin remains stationary in one component as the hinge opens or closes. This component is said to be exerting “primary retention.”
To maximize friction in a friction-fit hinge, holes should all be precision matched in terms of diameters. (This is commonly done by drilling or reaming all of the holes in one operation rather than separate steps.) The pin then uniformly exerts tension on all hinge components.
It’s important to note that engineering drawings may indicate that holes are precision matched, but holes in production parts may differ from the print. Technicians should always use calibrated gage pins to check the actual diameters.
Splitting tolerance and adjusting friction
Often it is not feasible to get precision matched holes. If so, designers can use a method called “splitting the tolerance.” For example, consider a 0.125-in.-diameter coiled spring pin that will be installed into a hinge. It has a recommended hole size ranging from 0.125 to 0.129 in. If holes through both hinge components cannot be precision matched, then the tolerance range (0.125 to 0.129 in.) is split between the components. In this case, the middle component would be drilled to 0.127 +0.002/-0.000 in., and outer component would be drilled to 0.127 +0.000/-0.002 in. This ensures the hole through the middle component is always larger than or equal to holes through the outer component. This helps lock the pin in place and ensures a friction fit.
Friction can also be adjusted by using different pin diameters. Larger pins means more friction as more of the pin’s surface area touches the holes’ walls.
General guidelines
For a typical three-component hinge, the minimum thickness of the outer components should be 1.5× the pin’s nominal diameter. (The nominal diameter is the installed diameter.) But if the outer components’ thicknesses are less than that, then the retention hole should pass through the middle component. And because the pin compresses as it goes through the hole, the end that is pushed through (the sized end), will be smaller than the other (unsized) end. For a free-fit hinge, holes in the outside components should then be set to the measured diameter of the unsized end plus a clearance factor, usually 0.001 in. This usually means a technician will have to put a similar pin through a prototype of the middle component.
Deciphering coiled-pin nomenclatureCoiled spring pins usually carry a six-field identifier. The first is an acronym, CLDP, which specifies a coiled spring pin. The next two are the nominal diameter followed by the length (mm). The fourth is the duty or stiffness of the pin in terms of coiling. It is either L for light, M for medium or H for heavy. The fifth designates the material. B for carbon steel; C for chrome stainless steel; D for nickel stainless steel; or W for alloy steel. The final field indicates the finish: K for plain,oiled; P for passivated, oiled; R for phosphate coated; or T for zinc plated. |
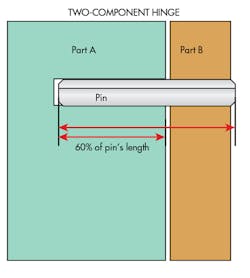
In two-component hinges, there are no outer or middle parts (see Two-component hinge). In these cases, 60% of the pin should fit into the retaining hole. Otherwise, the pin could eventually take on a tapered shape, expanding as it extends outside of the retaining hole. This increases the likelihood the pin will work itself out of the retaining hole, lowering the amount of friction between the pin and retaining hole. Shock and vibration will accelerate pin movement.
If it is necessary to put the pin in a blind hole in a two-component hinge (i.e., a hole that does not go completely through that component), it should be the retention hole as it provides additional security against lateral movement in at least one direction. It is also good practice to size the length of the pin in these instances so that it extends past the component with the through-hole. This ensures maximum engagement between pin and component.
The coefficient of friction of the pin’s and component’s material will vary, so a trial-and-error approach may needed to dial-in the desired ”feel” of the hinge. MD
Edited by Stephen Mraz, [email protected]
Resources: Spirol International Corp.
This file type includes high resolution graphics and schematics.
