Authored by: Ron Branch, Verisurf Application Engineer, Verisurf Software Inc., Anaheim, Calif. Resources: Verisurf Software Inc., verisurf.com |
Inspection software helps 3D CAD, 3D GD&T, and measuring devices work together to ensure design intent.
A necessary component of the model-based definition (MBD) approach to product design is 3D geometric dimensioning and tolerancing (GD&T), a universal symbolic and tolerancing language. In the MBD approach, the 3D CAD model is the authority, providing all the detailed product information for the entire product life cycle. The method moves the 3D CAD model from design to a manufacturing orientation, and lets software automate and validate steps in simulation, manufacturing, and inspection, thereby reducing human error.
Last updated in 2009, GD&T has been rigorously studied and applied by thousands of manufacturers around the world. It is often considered essential for communicating design intent — that is, that parts from technical drawings have the needed form, fit, function, and interchangeability. The recent update includes changes in feature design, datum references and degrees of freedom, surface boundaries and axis methods of interpretation, profile tolerances, and symbology and modifiers tools.
In manufacturing, the direction of CAD is to 3D, however not all CAD programs provide intelligent 3D GD&T data. Here, “intelligent” means computer readable, thereby capable of feeding downstream applications. There are two 3D GD&T definition-data formats. Potentially confusing, both are labeled “3D annotation,” but one format is purely for display, while the other provides intelligence back to the CAD model.
The distinction is that in the display format, tolerancing associated to the model is in the form of text. In other words, humans must interpret the GD&T information, opening the door to potential errors. The display or presentation format is similar to typing a math equation in Microsoft Word. It conveys information, but the computer cannot use it in calculations. In conversation, this approach is commonly referred to as “decorating the model.”
What makes the effort of applying GD&T to 3D models worthwhile? As part of the MBD approach, it helps users leverage data throughout product development, cutting time from processes and improving them. It can even be said that 3D GD&T data provides a form of “artificial intelligence” for manufacturing and inspection.
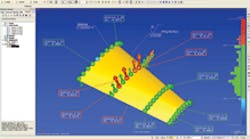
How to compare a 3D CAD file to a measured part Here are the steps to using an MBD package that includes 3D GD&T, such as Verisurf X: 1. Open the part’s 3D CAD file of the part using the inspection software. All intelligent and presentation GD&T data may be included. 2. If necessary, manually add presentation specifications to the model. 3. Develop a manual or automated inspection plan. 4. Run the inspection process. Verisurf X works with all digital metrology devices, including laser scanners for high-density point clouds, and portable CMMs (PCMMs), such as laser trackers and articulated arms with touch probes for capturing discrete points. 5. When using a PCMM, the software prompts operators to pick points that will align the physical object to the CAD model. For GD&T definitions, these alignment features are datum references. Once aligned, the software prompts operators to pick points on the part in the sequence determined by the inspection plan. 6. As measurements are taken, the software displays results graphically. Immediate feedback shows the value and deviation from the embedded GD&T tolerance. Thus, operators know immediately if a feature passes or fails inspection. This information is also documented in the pre-formatted inspection report, which eliminates data entry and manual calculations. |
Model-based GD&T for inspection
GD&T defines quality requirements, and inspection then confirms these requirements are being met. A MBD implementation requires there is a GD&T representation and that inspection software can import its data from the native CAD software. Or, when intelligent GD&T data is not available, users can add it to the 3D model in the inspection software.
In the MBD approach, 3D GD&T for inspection involves inspecting physical part measurements against a CAD model. This process can be dependent or independent of how or where tolerancing is defined on the CAD model. Consider, for example, inspection software such as Verisurf X from Verisurf Software Inc., Anaheim, Calif. It connects to and controls measuring devices such as scanners and laser trackers as well as stationary and portable coordinate-measuring machines (CMMs). It also accommodates both presentation and intelligent GD&T specs from 3D CAD models. Intelligent GD&T data is imported directly from supported software with the native 3D model and provides nominal dimensions. For presentation annotations, the quality or manufacturing engineer uses Verisurf to add GD&T specifications to the 3D model.
Importing information from a native CAD package as a 3D GD&T representation is a good example of MBD at work. The accuracy of the dataset is preserved. The same applies when GD&T display data (presentation) is imported directly (or via STEP translation) and entered into the inspection application. In both scenarios, there is no need to invest in creating or maintaining 2D drawings. Of course, 3D GD&T provides the most automated method.
Closing the loop
MBD with 3D GD&T closes the product-development loop by eliminating ambiguity. In addition, it provides GD&T inspection feedback to manufacturing engineers, who can use the data to determine root cause and either put processes under control or revise dimensioning and tolerance specifications.
A closer look at 3D GD&T GD&T is used on engineering drawings and computer-generated 3D models to explicitly describe nominal geometry and allowable variations. Dimensioning specs (for example, a basic dimension) define nominal geometry. Tolerancing specs (for example, linear dimensions) define allowable variations for individual features and allowable variations in orientation and location between features. 3D GD&T is defined in ASME Y14.41-2003 and ISO 16792:2006. 3D GD&T symbols include those for form, profile, orientation, location, and runout. Here are a few examples: |
