Computed tomography (CT) for non-destructive testing (NDT) has become quite common and is an affordable method for companies of all sizes, including higher educational facilities and R&D laboratories. In many cases, CT represents an upgrade from x-ray film and digital radioscopy. Most likely, those with x-ray experience—whose systems do not already include CT—are considering upgrading their existing system to CT. Or, they may be considering the purchase of a new system with CT in order to add additional capability.
The significance of CT for metrology cannot be understated. It has become so significant that the North American Coordinate Metrology Association (NACMA) chose CT as the main topic for its 2014 Annual Conference. The Association of German Engineers has also developed a set of standards to use CT for metrology, titled the Computed Tomography in Dimensional Measurement, or VDI/VDE 2630. The industry realizes CT generates 3D datasets, which can be used to measure geometrical features similar to traditional tactile coordinate measurement machines (CMM) or visual measurement machines (VMM).
These datasets open the door for other CT users: those who will use this technology to measure samples and compare the results to the allowed tolerance. Unlike the typical use of non-destructive optical and tactile methods, the main reason for using CT is its ability to measure invisible and unreachable features. with minimal effort. CT can measure internal features without cutting into the sample and without even touching the actual part.
When engineers design parts using 3D CAD systems (like AutoCAD, Solidworks, Pro/ENGINEER, CATIA, etc.), they must define the tolerances for all features and surfaces. No manufacturing process is perfect, and all have variations, with some tolerances being more critical than others. Some dimensions may be relevant for the function of the part, and some tolerances are more critical than others. Think of the proper fit of a shaft and a bearing: If the bearing is too big, it will be too tight, and if it’s too small, it will be too loose. There must be a definition for the tolerance that relates to both items.
This example is covered by DIN ISO 286-1, where the designer would call out a basic size and grade (e.g., H7) for both the shaft and the bearing. For other features, there are basically two relevant standards available. In the United States the ASME Y14.5 standard is common, whereas in the European countries the standard referred to most often is ISO 1011.
After the first prototypes, manufacturers perform a quality check. The process is very similar for cast- or injection-molded parts. Typically, CMM is used to measure all features with a tolerance stated in the drawing. Very often, it is difficult to measure these features, so the part must be cut into smaller pieces. Another option involves casting the parts into a box with resin, then cutting thinly sliced layers and trying to visualize the contour with a camera system.
CT can reveal these inner structures for many applications without destroying the part, and can be repeated easily on multiple parts. Specifically, the modern technology of injection molding can allow as many as 100-plus cavities per mold. Every cavity has to be qualified by the first article inspection process. Tactile and optical methods can be labor-intensive because they involve changing the orientation of the part in the system, and ensuring the probe starts at the correct point. These optical systems acquire data which must then be aligned using a software program. Performing these images with CT can significantly reduce process time and make the overall process much more cost-effective.
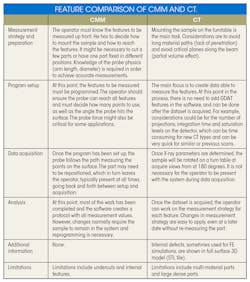
As in all metrology jobs, the measurement strategy is important, including CT. Once a good practice has been developed for a general type of part, it becomes much easier to duplicate the process and perform the scan. For CT, two main areas must be covered to perform the scan:
- Part orientation in the scanner: angle and placement.
- Scanner parameters: kV, number of projections, etc. (typically not critical to fix the part, as there is no probe touching the sample).
Once the part is in the system and the parameters are set up, a click of a button starts the scan. After the scan is complete, features can be measured with 3D measurement software. The measurement strategy for the features can be determined after the scan and the part can be used for further evaluation, if necessary. CT covers the entire part, including internal surfaces.
The Geometric Dimensioning and Tolerance (GD&T) features can be created after the scan. When the measurement template is created, it can be applied to other scans and then reports are generated for evaluation. With CMM, this is often not possible and usually involves re-measuring the feature. Occasionally, there are simply no other methods available to generate the required data. Very often cutting the part changes the geometry and leads to inaccurate results. CT is a non-contact, non-destructive method that doesn’t touch or change the geometry of the sample.
When time to market (TTM) is critical, for prototypes or production, CT has been proven to be the answer. TTM should not be an opposing attribute to quality, and with CT it doesn’t have to be. Some statistics suggest scan times can be 20% to 80% faster compared to traditional methods. The technology has the potential to improve TTM for smaller companies to enable competition within the global market.
All of the above are very exciting details, which may lead you to believe CT can replace CMM and VMM. This is not always the case. It should be made clear there are limitations with CT and it is not a replacement for many applications. It is important to consider the main factor limiting metrology with CT is the x-ray source. The x-ray source can only penetrate so much material in one scan. And, to scan multi-material parts is a very difficult task.
Currently, the main success for CT has been with injection molded parts up to approximately 200mm diameter and 300 mm length, but with best results in the range of 10 mm diameter to 80 mm length. Aluminum and magnesium castings (e.g., die castings) with up to approximately 200mm³ are also good candidates for CT. Unfortunately, it is worth noting that grey iron castings or injection molded plastic with steel inserts are not the best fit for successful scanning with CT and metrology.
Below is a short list of CT advantages over CMM:
- Ability to measure internal features
- Contact free methods => no dimensional change by probe force
- No clamping or sectioning required
- In addition to GD&T results, flaw detection is included: porosity and inclusions
- Flaw data can be used to verify cast/flow simulations
- High resolution surface model => actual vs. nominal comparison of entire surface including internal walls
- Easy to repeat => faster results specially on multi-cavity injection-molded parts or multiple molds for castings
- Additional features can be measured at a later point without the need of the physical part
- Data can be used for reverse engineering
- Cost-effective, ease of use, decrease of TTM
We believe this basic information will allow you to better understand the benefits of CT. With many advantages over CMM, and the availability to upgrade existing X-Ray systems to CT, CT should be a consideration for future analysis.
Dirk Steiner is business development manager for CT with YXLON.


