Using Desktop 3D Printing to Get More Out of CNC Machines
Download this article in PDF format.
The CNC mill is the foundation of most modern machine shops, and it’s usually the tool with the most demands competing for its time. This means making tough choices when small-volume parts are needed. One-off jobs like fixtures and workholding often take the mill out of production for revenue-generating parts.
Acquiring an additional mill for support work is usually not financially realistic. So, until recently, there wasn’t a good solution to this problem, and this led to jobs being rejected for lack of CNC time or deadlines being missed and customers upset.
However, over the last few years, a solution has emerged: desktop 3D printers. New materials available for today’s 3D printers are stronger and more capable. Increasingly, shops use an affordable desktop 3D printer to take on support jobs to free up CNC mills. With fast overall turnaround times and enough strength, stiffness, and accuracy for many smaller jobs, the desktop 3D printer is quickly becoming a cost-effective companion to traditional CNC machines.
Scheduling jobs in a machine shop is a complex challenge. The best way to increase the return on investment (ROI) in expensive equipment is to keep that equipment busy doing productive work. Thus, the ideal CNC job is a higher-volume production order with little or no refixturing.
In real life, however, production interruptions are constant and often unavoidable. Many CNC tasks require custom fixturing pieces for efficient completion, and the CNC mill is usually the tool used to do this one-off, but necessary, work. These jobs are just as critical as production, but generate no profit. Moreover, these ancillary jobs are often more complicated and take more time to program and machine than actually making the final parts.
In short, ROI and productivity, always tied to revenue and performance, are far better if production machines are producing. So if a shop can offload the one-off cost work from a CNC mill, that’s a win.
3D Printing in the Machine Shop
Aluminum is often the material of choice for prototyping and fixturing due to its low cost, high availability, and ease of machining. Despite the fact that aluminum is often many times stronger than needed for prototypes, machining a plastic instead, often acetal resin or something similar, is often considered more difficult and not worth the time. Just choosing a plastic is complex enough, which is why it’s generally considered more direct and efficient to go straight to aluminum.
The key factor for bringing 3D printing into the machine-shop ROI mix is that desktop 3D printers are designed to make it hassle-free to create plastic parts. For a 3D-printed object, the part is printed based on a CAD file; toolpaths needn’t be set up in CAM programs. The part is then created on a machine that is smaller and less expensive than a CNC machine with minimal operator interaction.
Common 3D-printable plastics are strong enough for a variety of prototypes, fixtures, and one-off parts. There are also now more plastics that are strong, tough, and stiff—and especially well-suited for checking shape and fit, and making fixtures for shimming, clamping, and orientation. Furthermore, 3D printers make it easy to work with plastic.
That said, various 3D-printing processes have been available for over 20 years, yet they haven’t made great inroads into plants and shops. So what has changed?
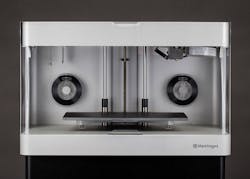
The Mark Two desktop 3D printer from Markforged combines the tough, non-marring properties of nylon with internal reinforcements of continuous-strand, high-strength composite fibers such as carbon fiber, Kevlar, and fiberglass to produce industrial-strength parts, such as tooling and fixtures. It helps alleviate the machine and operator time costs associated with CNC production of workholding pieces.
Accessibility and quality are key. Even in 2016, the accessible workshop or workgroup 3D printer was a new product category. An increasing number of 3D-printer companies have also chosen to support shop-scale customers with offerings boasting ease of use, reliability, and readily available technical support formerly reserved for industrial 3D printers. These are not features of 3D printers hobbyists or the consumer market. Hobbyist 3D printers appeared a few years ago, but these machines are finicky and not for the faint of heart—more time can be lost attending the printer than saved by using it.
Perhaps most importantly, 3D-printing materials are better than ever. Tougher ABS, nylons, composites, and photopolymers have appeared at an accessible level, and it seems nearly every week some company releases a new 3D-printable material with specialized properties.
Today, if you can use CAD, you can use a 3D printer to do valuable work. If not, all is not lost, because CAD has become much easier to work with, and more accessible, too.
3D Printing in Action
The first step in designing a part for 3D printing is the same as designing it for CNC milling: Engineers use a 3D modeling program to construct a solid body. In many cases, the solid model designed for a machining process can be reused for 3D printing, although engineers experienced in 3D printing often make minor changes to ensure 3D printing is more efficient. After the design is complete, the model is commonly exported from the 3D CAD program in “.STL” file format, an industry standard.
CAM is not required in 3D printing. Instead, the equivalent of toolpath generation is performed by a program called a “slicer.” Nearly all professional 3D printers include easy-to-use slicer software. It “slices” the part into many discrete layers, and then generates toolpaths and machine code, which is used by the 3D printer.
With some machines, the machine code is transported to the printer via a thumb drive or USB cable. Other machines are connected to computers using Wi-Fi or Ethernet over an office or shop network. Still others are internet-enabled and let users print from home or on the road.
Although there are many types of 3D printing processes, accessible professional 3D printers today use one of two fundamental types: thermoplastic extrusion or selective photopolymer curing.
Thermoplastic-extrusion printers, also called FFF (fused filament fabrication) printers, are essentially high-precision, robotic glue guns that melt and extrude both common and engineering thermoplastics such as ABS and nylon. Tiny extrusion nozzles moved about by X-Y-Z gantries form the shape of each layer. Photopolymer curing printers, called SLA (stereolithography), use lasers or light projectors to solidify pools of light-curing epoxy to repeatedly form the part’s layers. Both techniques build up many thin layers (often about 1/10 mm, or 4 thou per layer) until the three-dimensional part is complete.
Dimensional accuracy and resolution are related to printer technology and the manufacturer implementation, but most professional 3D printers are capable of a shop role. Here are some real-world examples of 3D printing giving CNC milling a boost.
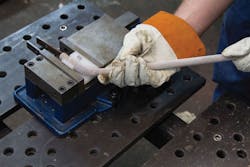
Workholding—Soft Jaws: Some fixtures, including soft jaws, include curved or complex surfaces that typically require surface milling operations with a ball-nose end mill to create the desired geometry. Because 3D printing is an additive-manufacturing process and requires no toolpath programming in a CAM package, curved surfaces are no more difficult to create than planar features. All geometry is handled by the software. 3D printers excel at producing these types of fixtures because the relative complexity of a part’s geometry generally does not significantly affect the print time for fixtures or any other parts.
The metal workholding jaws (top) can scratch parts made of softer metals and other materials. The 3D-printed version (bottom) uses softer metal jaws that will not harm the surfaces of the pieces they hold in place for CNC machining.
Rob Bradshaw, head of Superstition Machine Works, uses a 3D printer to make soft jaws that hold complex shapes for drilling at difficult angles. According to Bradshaw, “I print things to save hours of time machining. And I’m drawing the soft jaws in the computer anyway. Not only do they look good, but they also worked perfectly. On one job, all 32 parts were cycled with no issues, with the last one fitting as well as the first.”
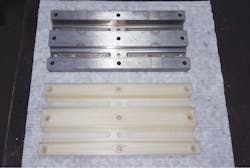
Fixturing—Flats and Plates: Most fixtures (besides jaws) are largely flat. However, CNC milling them would include different operations that are time-consuming and may be difficult or tedious, especially on fixtures that must be reoriented several times to create off-axis geometries. Plate-like shapes are particularly well-suited to 3D printing’s layered or additive manufacturing. Plates are shapes that can be printed quite fast and , match up well with 3D-printing techniques. They arealso predictably strong in-plane.
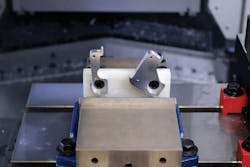
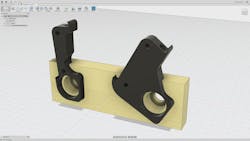
A metal workholding piece (top) made by CNC milling was replaced with a 3D-printed version (bottom) that was much less expensive and could be created in two days instead of two weeks. The printed version is also lighter and easier to handle.
Joe Walters, design engineer at Arow Global Corp., uses his team’s 3D printer to create prototype extrusion profiles for rubber and aluminum extrusions, as well as to replace steel drill-jig components being used on Arow’s manufacturing line. “We can now take a part that would have cost $400, plus two-and-a-half-weeks lead time of machining from one of our local vendors, and print it over the weekend. And the manufacturing floor likes it just as much, if not a little better, because it takes some of the weight out of that jig.”
Gages and Quality Control: 3D printers can do more than produce parts. They can also simplify quality control (QC). Well-developed CNC machining processes can are able to quickly churn out many copies of a part. However, as the volume of the job grows, it can be a challenge to spot defective parts and react to broken tooling, which would minimize scrapped parts.
This is where inline QC becomes valuable, and a good go/no-go gage can save time and money. Each project is different, but producing a gage may require a good deal of complicated machine fixturing or extensive multi-axis milling, both of which can tie up expensive CNC machinery for hours.
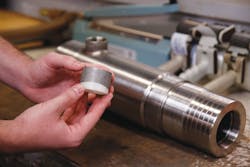
3D printing can also make low-cost go/no-go quality-control gages such as this one, which is used to check the inner diameter of machined tube fittings.
Many commercial desktop 3D printers can easily turn out parts with the tolerances needed by a good QC gage. Furthermore, since 3D printers require no complex fixture setups, creating a useful gage is as simple as designing it in CAD and sending it off to the printer—no operator monitoring required. Even better, 3D printing the gage frees up the CNC mill from a time-consuming task, thus letting a production machine do its intended job: producing.
Daniel Shepherd, Quality Manager at Turret Lathe Specialists, a high-precision job shop, uses 3D-printed nylon gages to ensure stainless-steel fittings are machined with the correct radius. This makes Turret Lathe confident the fittings will withstand critical pressure applications used in the oil and gas industry.
“The 3D-printed templates and fittings we used to make out of aluminum match the quality of the old aluminum tools, no question,” says Shepherd. “We haven’t had any issues with tools breaking, at least not any sooner than they would have had they been made out of aluminum. And knowing that we’re saving on time and money, that just sweetens the deal.”
Non-Marring and Modular Fixtures: Preserving the surface finish on parts that have just come back from a finishing house is not easy. This is especially true when a job dictates final machining operations or touch-up work on parts that have already undergone powder coating or anodization. Aluminum is often an inappropriate material for custom fixturing at this point; it’s often harder than the surface finish material and can easily mar an otherwise flawless surface. At this stage, workholding fixtures are instead commonly machined from a relatively stiff, non-scratch plastic, such as acetal resin or UHMW-PE. But producing these fixtures requires time on in-house CNC equipment, once again displacing production jobs.
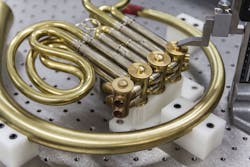
Non-marring 3D fixtures are used to make and check tubing used on a French horn, ensuring the brass will not be marked up or marred.
Keith Durand, Senior Mechanical Engineer, Markforged Inc., uses 3D-printed modular fixtures to hold musical instrument parts for bending and machining operations in brass. The plastic surfaces of the 3D-printed parts preserve the delicate surface finish of the instrument during production and assembly. He can also create curves and complex guiding surfaces that would be extremely expensive and challenging to produce with a CNC mill, requiring a machine with more than three axes and several resetting and refixturing operations.
“The most complicated bending fixture was for the F-branch,” says Durand, as he recalls working on a French horn. “It had to be the right shape to bend things around, but had to have clearance so I could get the tube in there in the unbent configuration and out once the part was bent. 3D printing more or less makes it complexity-free. Machining this particular fixture, on the other hand, would have cost a small fortune.”
Selecting the Right Material
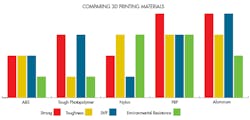
Although not every 3D printer will work with every material, here is a short list of materials generally considered suitable for effective shop use, and why. These materials can be 3D-printed by machines costing between $3,000 and $30,000, with more expensive printers typically offering larger build volumes and a greater range of usable materials. Most fixtures used with 4- or 6-in. machining vises can be printed in a medium-sized build volume. Materials are not identified by manufacturer or maker. New materials are regularly introduced into product lines and some printers use a wide range of third-party materials.
- ABS (acrylonitrile butadiene styrene) is the most commonly available plastic for workshop or workgroup printers. It is well-known and familiar, being the most common consumer plastic. ABS is not usually considered strong or durable enough to be an engineering plastic. Its main drawback is that it produces a distinctive odor and potentially irritating fumes when melted. So when 3D-printing with ABS, use adequate air filtration in office environments.
- Tough Photopolymer is a recently developed material for photopolymer printers. Formerly, photopolymer prints were too brittle for workshop use, but these new materials, which include additives that reduce strength but increase toughness, are more suitable for engineering and workshop use, and have mechanical properties similar to ABS.
- Nylon is readily available, although far fewer workgroup and workshop professional printer makers provide technical support for it. This engineering thermoplastic is among the most chemically resistant plastics and is well-known for toughness and self-lubrication properties. Nylons suitable for printing at room temperature are incredibly tough, but not as strong as photopolymers.
- FRP (fiber reinforced plastic) is becoming more widely available. These materials, which use chopped fibers to increase stiffness or continuous fibers to increase strength, are commonly used in injection-molding aerospace and automotive manufacture.
We have not included PLA (polyactic acid), the most common hobbyist material. It’s a recyclable material favored for low cost and easy operation. Though quite useful for prototyping, it does not hold up as well as the other materials in load-bearing, fixturing, or withstanding impacts.
In addition, various third-party materials and 3D-printing machine manufacturers offer mixes of some of the above (e.g., ABS/polycarbonate), with blended characteristics that represent tradeoffs between strength, toughness, stiffness, and chemical properties.
Daniel Leong is Content Engineer at Markforged.
