8 Tips for Designing 3D Printed Parts
While 3D printing has a reputation for offering an infinite variety of design possibilities, the truth is there are still rules to follow to ensure that parts are manufacturable and tough enough to last. A Design for Additive Manufacturability (DfAM) analysis can help, but understanding the basic limitations of 3D printing will allow issues to be corrected before they are submitted for an analysis and a quote.
Most manufacturers offer several additive technologies, including direct metal laser sintering (DLMS), stereolithography (SLA), selective laser sintering (SLS), multi-jet fusion (MJF), poly-jet and carbon DLS. Check out these technology options to explore their quirks and advantages.
And use these eight tips to keep 3D printing projects moving in the right direction:
1. Holes and Channels: Making Nothing with Something
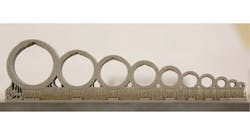
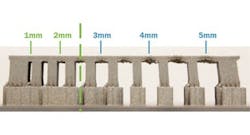
First-time users of 3D printing can get carried away with thoughts of creating amazing Swiss cheese-like structures. But each additive technology has its own limitations on the widest channel that can be built without needing support structures.
When designing large holes and channels, the key is to find ways to use the power of gravity to defy gravity. For example, arches work because the stones above the ground (especially that magical keystone in the middle) press against each other laterally to maintain their vertical structure. It’s the same with printed parts. To avoid sagging in channels and holes, consider using alternative shapes like diamonds or circular holes with a vertical rib.
2. Thick Areas can Cause Surface Defects
Let’s start with the premise that we mentioned earlier—that sagging can ruin parts. This is even more of a problem when printing a thick area. In some technologies, areas that are too thick can cause surface defects like sinking or bulging. Additionally, cross-sections that are too large will start to pull in at the edges, which affects the part’s dimensions. High-material-volume parts lead to more expensive builds. It’s best to either apply infill or to carve out material that isn’t critical.
3. Angles can be Functional and Cosmetic
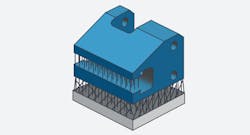
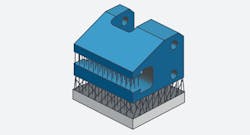
Most technologies need at least a 45-deg. angle from the build plate to avoid support structures. This is important when optimizing designs for additive manufacturing. In most cases, supports are removed manually, which limits the accuracy of supported surfaces. Also, a myriad of supports will increase the build and finishing time, and therefore the cost of the part.
On the flip side, up-facing angled surfaces will have some degree of stair stepping. Shallow angles will have the most noticeable stair stepping. In addition to communicating functional needs, it’s also useful to communicate cosmetic needs for parts. The more cosmetically pleasing they are off the printer, the less cosmetic work must happen afterward.
4. Smooth Structures, Less Stress
Is there anything more wonderful visually than a gentle curve? That’s certainly the case in 3D printing where interior radii are concerned. Building smooth, flowing structures instead of sharp corners relieves stress on the build, especially when sudden changes in thickness can be avoided. Even better, smooth curves look great.
5. No Less Than a 40:1 Height-to-Wall Thickness Ratio
This tip is especially true for metal parts using direct metal laser sintering (DMLS). For part walls to remain strong, remember the rule that recommends a height-to-wall thickness ratio of 40:1. Anything less has a strong likelihood of snapping under even mild pressure. One option for going thin is to create walls that are self-stabilizing, like the wall of a cylinder, but the fins of something such as a heatsink might not survive if they are too thin.
6. 3D Printing can Handle Big Prints, Small Resolutions
Once, designers had to turn to manufacturing methods such as CNC machining or injection molding to get large parts. That’s no longer true as many printers can make parts that are surprisingly big. For example, some of our DMLS printers can build parts as large as 31.5 in × 15.7 in. × 19.7 in. and stereolithography (SLA) up to 29 in. × 25 in. × 21 in.
Larger parts should be built in several sections, then bonded together. On the other side of the coin, while big is great, sometimes incredibly tiny details need to be rendered precisely. Micro-resolution 3D printing may be a fit. ABS-like MicroFine™ Green resin offers tolerances of 0.005 in. and layers as thin as 0.001 in.
7. Using the Z-Axis to Increase Size, Accuracy
Here’s something to think about: Sometimes, size and accuracy can be increased by knowing the best direction to print a part. How the Z-axis (the build direction) is situated can affect parts. It’s common for technologies that require support structures to build vertical walls more accurately.
Communicating critical features before building will guide the orientation used for the build. Remember sag? Sometimes it’s not a problem when the print is built to counter that. For example, a tube-shaped part will end up slightly oblong if built lying down. Building the part standing tall will help with roundness.
8. Mind the Gap for Form and Function
Just as it’s hard to draw lines really close to each other without the ink from one line bleeding to touch its neighbor, it’s also tough to keep printed lines from touching if they’re too close to one another. Revisiting that heatsink example, imagine printing the fins of that part with very little space between them.
It’s a good bet that they might make contact, potentially ruining the aesthetic and possibly even the functional aspects of that part. An ABS-like resin might be a good option, as it handles gaps as small as 0.013-in. wide. Keep in mind that the longer the gap, the wider it must be to avoid sealing shut.
3D printing is filled with opportunities to create amazing parts; the key is to know how to work within the limitations of the technology and how best to design around them. Knowing how to design for 3D printing will result in higher quality parts and cost savings.
Chloe Vollaro is a 3D printing applications engineer at Protolabs.


