At its core, metal additive manufacturing (AM) empowers product designers and manufacturing engineers to produce highly complex parts and sophisticated manufacturing aids that couldn’t be made easily or at all with traditional methods or technologies.
Metal AM promises unlimited opportunities to design and develop parts in ways that will dramatically improve the overall quality of manufacturing while reducing waste, improving the supply chain and reducing lead times. The reality, however, is that significant hurdles exist as today’s metal AM manufacturing processes are still evolving in terms of robustness and reliability. Moreover, materials testing procedures are lengthy, laborious and costly.
Undesired variations in powder feedstock, substrate conditions and laser calibrations can be undetectable, which further complicates the entire materials testing and verification process. What’s been missing until recently is an innovative quality inspection process that not only saves significant time and expense, but also reduces the amount of waste typically associated with traditional manufacturing methods.
No Margin for Error
There is no margin for error when it comes to manufacturing safety-critical components required by highly regulated industries, such as aerospace, automotive, aviation, defense and medical. Moreover, ensuring “womb-to-tomb” traceability is both arduous and complex, as is validating that all parts can be fabricated in accordance with the Metallic Material Properties Development and Standardization (MMPDS) specifications. MMPDS is considered the “gold standard” by leading regulatory bodies, including the FAA, DoD and NASA.
MMPDS serves as the primary source of statistically-based, design allowable properties for metallic materials and fasteners used by many commercial and military aerospace applications worldwide. Critical factors are recorded, including mechanical property design allowables, physical properties, stress-strain, temperature and fatigue. A material achieving A-Basis in MMPDS—the highest threshold—means at least 99% of the population reaches or passes 95% confidence or the specification minimum when it is lower. B-Basis requires at least 90% of the population equals or exceeds value with 95% confidence.
The stark reality for many engineers today is that while they can design the greatest and most innovative parts, many of their designs cannot be produced efficiently due to current testing and manufacturing challenges. There are no shortcuts when it comes to testing, which is why a general rule of thumb is it will take years and millions of dollars to complete an entire testing cycle.
Never-Ending Testing Cycles
Typically, the highest hurdle to clear involves the inordinate amount of time and exceptional expense involved in testing, re-testing and perfecting materials to achieve the highest levels of confidence statistically before moving forward. Testing, as it is performed today, is complicated and creates lots of waste.
For instance, achieving A-Basis typically encompasses testing up to three heat lots, and then fabricating literally hundreds of test bars to evaluate their material properties and perform endless quality checks. Simply put, it requires exhaustive amounts of work and there has been no easy alternative.
Much of today’s material testing revolves around some form of destructive testing, destroying something on the part to get data on what’s happening with the build plate. This is costly and wasteful, but recording the value is necessary. The process takes time and money—and it also puts manufacturing machines, which should be running 24/7, on hold until the process is completed.
“Much of today’s material testing revolves around some form of destructive testing, destroying something on the part to get data on what’s happening with the build plate. This is costly and wasteful, but recording the value is necessary. The process takes time and money—and it also puts manufacturing machines, which should be running 24/7, on hold until the process is completed.”
Unless a facility has all the infrastructure needed on site, it can take weeks or even months between the start of the process and gathering sufficient, usable test data. Meanwhile, machines sit idle.
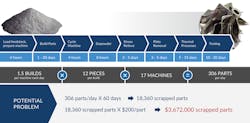
The figure below illustrates a hypothetical example of what’s at stake. A facility has 17 machines and averages 1.5 builds per machine per day, and there are 12 pieces per build. That equals 306 parts which are produced each day. Any undetected materials problems along that process value chain could result in a significant financial impact. For instance, if the problem went undetected for 60 days, the company would be saddled with 18,360 scrapped parts. At $200 a part, that’s more than $3.6 million down the drain.
Verifying Build Quality
What’s been lacking is a simple method to rapidly perform a build quality inspection for metal AM to avoid or lessen current testing shortcomings. Not only would such a solution save manufacturers months of testing and potential production delays, but also millions of dollars in manufacturing costs. The need has been accentuated lately because the market for metal additive is growing exponentially.
When chasing a machine or material issue, typically the trail starts with density blocks that must be examined for their material properties. The clock starts ticking as the wait begins for the little cubes to be cut off the build plate by a band-saw or wire electrical discharge machining (EDM). Then the blocks are examined under a microscope to determine any microstructure issues, which often takes days to complete the entire process.
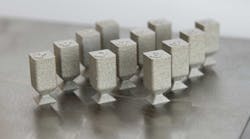
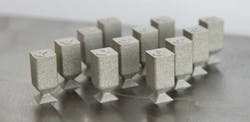
While removing density cubes with different parameter combinations, an interesting and obvious phenomenon appeared. The parts with parameter combinations close to the “sweet spot”—aka, fully dense—were much harder to remove from the plate than the less ideal ones. This was an a-ha moment: Why not change the geometry to create cubes that could be removed easily from the plate by hand or wrench with a torque meter?
This new cube geometry led to the next logical progression: During material properties characterization, it’s possible to correlate torque breakaway between various material properties, such as tensile, fatigue and density. By establishing these correlations between various material properties, an early-build indicator may emerge to spot build issues much faster.
For example, if statistical process control (SPC) limits of a material are established as 70 ft-lb ± 5 ft-lb, and after numerous builds, it’s revealed that a build breaks at 50 versus 70, stop the build. Thanks to the Rapid Quality Inspection Specimen (RQIS), this straightforward process is both feasible and available.
Results in Hours, Not Months
Developed by Jabil, Auburn University and NASA in July 2020, RQIS is designed to identify and quantify any deviations in build or material quality through a series of tests that can be performed within a few hours after fabrication. Using a couple of simple artifacts, in conjunction with proper data preparation and correlation, a streamlined inspection process investigates the dimensional accuracy, geometry compliance and surface toughness of various surface angles.
This innovative method enables metal AM engineers to identify and quantify deviations on build/material quality through a series of tests that can be performed within 2-3 hours of initial fabrication. This represents a huge improvement over the 2-3 months typically needed to complete all required testing and analysis of dimensional accuracy, geometry compliance, surface roughness at various angles and mechanical properties, such as torque and angle of twist.
Jabil, along with collaboration partners at Sandia, NASA, Auburn University and the ASTM Center of Excellence, currently are working together to test multiple materials and publish data from their findings. This open partnership welcomes additional participation, as sharing RQIS results is a huge step forward for advancing efforts in metal additive manufacturing. It’s all about boosting overall confidence and quality today while empowering manufacturing engineers to build groundbreaking parts tomorrow.
Matt Donovan is the chief engineer for Metal Additive Manufacturing at Jabil. He brings more than 20 years of experience in aerospace and defense to his current position leading Jabil’s metal AM production strategies.


